WarZone Count
An Action-Point Combat Engine for OSR Games
English source manuscript · v1.0 (2026-07)
What This Is
WarZone Count is a combat expansion module for OSR games. It is an add-on, not a replacement ruleset: it is built to make combat more tense, kinetic, and eventful, while the host game's attack rolls, AC, HP, damage, saves, spells, morale, classes, and levels stay in place.
Its source ruleset is the standalone game Konsei Reiyotan (混世霊妖譚) (official site). WarZone Count extracts that game's Vigor count, Breath, reaction, Lull, and Zone concepts and rebuilds them as a compact subsystem for OSR play.
The core action-economy idea ultimately traces back to Nechronica - The Long Long Sequel - (original title: 永い後日談のネクロニカ), created by Ryou Kamiya. To state the lineage plainly: Nechronica - The Long Long Sequel - is the foundational inspiration, Konsei Reiyotan is the separate source ruleset, and WarZone Count is the OSR combat expansion derived from it.
WarZone Count replaces initiative and measured combat movement with a shared count-down and a small Zone map. The rules that make your game what it is stay untouched.
Keep the host game's attack rolls or THAC0, ascending or descending AC, HP, damage dice, saving throws, spell effects, morale, experience, classes, levels, surprise, and encounter procedures. WarZone Count wraps those rules in a faster time structure and a more legible battlefield.
You add only one number to a character or monster: Vigor.
Contents
- What this module changes
- The host-game contract and three-tier checks
- 1. Vigor and the Count
- 2. The Action Menu
- 3. Readied and Improvised Reactions
- 4. Rounds and Lulls
- 5. Zone Battlefields
- Optional Module 1: Detailed Control
- Optional Module 2: Squads
- Optional Module 3: Stances
- Tuning the Pace
- Worked Combat: The Broken Line
- Monster and Faction Overlays
- Three Battlefield Templates
- One-Page Reference Card
- Credits, Production, and License
What This Module Changes
The five core modules work together:
- Vigor and the Count replace initiative and alternating turns.
- The action menu prices movement, attacks, casting, and battlefield work in Vigor.
- Readied and Improvised reactions let combatants defend and control approaches.
- Rounds and Lulls give the Count a clear reset and maintenance rhythm.
- Zones replace grids and measured movement with a tactical node map.
Three optional modules add Detailed Control, Squads, and Stances. Adopt an option only once its core dependency is in play: Detailed Control requires module 5, Squads require Detailed Control or Simple Control, and Stances stand alone.
If you want only the Count, use modules 1–4 and keep the host game's distances and movement. Played that way, Move uses the host movement allowance, and Interdict triggers when an enemy closes into melee reach. Off-Map, Ambush routes, and other Zone-specific rules are unavailable.
The Host-Game Contract
WarZone Count changes when a host action happens, where it happens, or what Vigor it costs. It does not change how the host game resolves that action.
- An Attack still uses the host attack bonus, THAC0, AC, critical-hit rule, damage, and number of attacks.
- A spell still uses the host spell list, slot or preparation rules, range, save, duration, and effect.
- A morale check still uses the host morale score and dice.
- A creature at 0 HP still follows the host rules for death, dying, or defeat.
- A class feature remains a class feature. If it grants a complete attack routine, that routine is one Attack maneuver here.
Where WarZone Count adds a new trigger—such as a morale check after a Pincer—the host procedure resolves it.
Checks
The module names only three difficulties. Use the column that matches your host game.
| Difficulty | Roll-under ability | d20 + modifier | Ability-less monster or NPC |
|---|---|---|---|
| Standard | roll under the ability | DC 10 | relevant save or d6: 4+ |
| Hard | roll under ability −4 | DC 14 | relevant save or d6: 5+ |
| Dire | roll under ability −8 | DC 18 | relevant save or d6: 6 |
Rules text writes a check in this form: Standard check (roll-under ability / DC 10). Replace “ability” with the named ability where one is specified.
When a rule makes a check one step easier or harder, move one place on this ladder. A check made easier than Standard succeeds without a roll. Dire is the hardest step. WarZone Count does not use opposed checks; when the opposition is exceptional, raise the fixed difficulty instead.
As a calibration guide, ordinary adventurers tend to succeed about 50–65% of the time on Standard checks, 30–45% on Hard checks, and 10–25% on Dire checks. Very high or low abilities shift those bands.
1. Vigor and the Count
Vigor folds initiative, tempo, and action currency into a single number.
Maximum Vigor
For a player character:
Maximum Vigor = 10 + DEX modifierBefore armor, the result ranges from 7 to 13. Plate-grade armor reduces Maximum Vigor by 1.
For a monster or NPC:
Maximum Vigor = 8 + ceil(HD / 2), maximum 13So an HD 1 creature has Vigor 9, an HD 4 creature has Vigor 10, and an HD 9 creature has Vigor 13. No conversion table is needed: add a Vigor line to the existing host stat block and leave every other value alone.
At the start of each Round, every participant resets to Maximum Vigor, then applies any carryover penalty. Vigor does not recover on its own during the Round.
Running the Count
- Compare every participant's remaining Vigor.
- The participant with the most remaining Vigor takes one Breath.
- Pay the Vigor costs of the maneuvers used in that Breath.
- Compare remaining Vigor again.
- Continue until everyone has 0 Vigor. Then resolve the Lull.
At the start of its selection, a participant may forfeit all remaining Vigor and drop to 0. This stops one last unspendable point from stalling the Count, and it cannot be reversed that Round.
The Count is not a conventional initiative roll followed by alternating turns. A combatant who stays ahead can take several Breaths before a slower combatant takes one, and reactions can shift the order too, since they spend Vigor outside the reacting creature's Breath. Recompare after every Breath and every reaction window.
Break ties in this order:
- Between player characters, higher DEX acts first.
- Between a player character and a monster, the player character acts first.
- Between monsters, higher HD acts first.
- If a tie remains, the GM decides.
The Breath Limit
A Breath may contain one or more maneuvers, in any order. Their total cost cannot exceed the Breath Limit of 5, and the acting creature must have enough Vigor to pay the total.
Common examples of a complete Breath:
- Move 2 + normal Attack 2 + Ready Guard 1 = 5.
- Normal Attack 2 + normal Attack 2 + Ready Guard 1 = 5.
- Heavy Attack 3 + Ready Interdict 2 = 5.
The Count does allow repeated attacks, but Flurry Fatigue makes the later ones increasingly inaccurate.
Overload
A creature about to resolve a Breath above its current limit may declare Overload and make a Standard CON check (roll-under CON / DC 10).
- Success: resolve the whole Breath. The creature's next Breath Limit is 3.
- Failure: resolve the whole Breath anyway, then lose all remaining Vigor and become Exposed.
Either way, the declared maneuvers all resolve; the wager is tempo. Focus 4 + Release 2 in one Breath is the most common Overload. Even through Overload, two heavy Attacks remain prohibited.
A pending Breath Limit of 3 carries across the Lull: if a creature Overloads on its last Breath of the Round, its first Breath of the next Round has Limit 3.
Exposed
An Exposed creature suffers all of the following:
- AC worsens by 4: −4 ascending AC or +4 descending AC.
- It cannot use reactions.
- It cannot declare or maintain a Stance.
Exposed ends at the start of that creature's next selection on the Count. If the Lull comes first, it ends during the Lull.
Mob Activation
When many minor creatures share the same Vigor, the GM may run them with Mob Activation: every creature in the mob takes the same maneuver combination at the same Count and reduces Vigor together. Each still keeps its own HP, attacks, damage, saves, and position.
Split a creature out of the mob as soon as it needs a different action or a separately tracked position. If the Squad option is in use, run organized units with the Squad rules and keep Mob Activation for loose groups.
2. The Action Menu
The costs below replace the host game's combat action timing. How each action resolves still follows the host game's own rules.
| Maneuver | Vigor | Effect |
|---|---|---|
| Attack — normal weapon | 2 | Resolve one complete host attack routine with a one-handed melee weapon, bow, thrown weapon, or comparable routine. |
| Attack — heavy weapon | 3 | Resolve one complete host attack routine with a two-handed melee weapon, polearm, crossbow, musket, or comparable heavy routine. Two heavy Attacks cannot be combined in one Breath. |
| Move | 2 | Move to one adjacent Zone. |
| Rush | 3 | Move to one adjacent Zone. Gain +1 on your next attack roll in the same Round. |
| Focus | 4 | Name a spell and begin casting it. Focus persists until Release, even across a Lull. |
| Release | 2 | Resolve the focused spell under the host spell rules. |
| Ready | 1–2 | Prepay one reaction: Guard 1, Parry & Riposte 2, or Interdict 2. |
| Grapple or Shove | 3 | Make the check below. On success, grapple the target or force it into an adjacent Zone. |
| Improvised Action | 2 | Attempt an action not listed here with a Standard check (roll-under relevant ability / DC 10). |
| Reload | 3 | Reload a crossbow or firearm. Reload is free as a maintenance choice during the Lull. |
| Declare a Stance | 1–2 | Use this only if the Stance option is adopted. |
An action that duplicates a listed maneuver, or a weaker version of one, still pays that maneuver's listed cost. Improvised Action is not a discount menu.
Attack Routines
One Attack maneuver resolves one complete attack routine granted by the host game. A fighter's level-based number of attacks or a monster's claw/claw/bite routine remains one routine and one maneuver. Apply one Flurry Fatigue penalty to every attack roll within that routine.
The GM classifies an unusually large, slow, or heavy monster routine as a heavy Attack costing 3. A special ability that replaces a creature's ordinary attack routine pays its assigned Attack cost, unless the host rule is purely movement or calls for a different listed maneuver.
Spend monster Vigor on movement, special abilities, and reactions as well as attacks; a monster that only attacks is spending its tempo badly.
Grapple and Shove
Make a Standard STR check (roll-under STR / DC 10).
- If the target has more HD or levels than the acting creature, make a Hard STR check (roll-under STR −4 / DC 14).
- If the target is Large, make a Dire STR check (roll-under STR −8 / DC 18).
If both conditions apply, use only the harder difficulty. On a grapple, use the host game's ordinary consequences for being held. On a shove, move the target into one adjacent Zone.
Focus and Release
Focus names the spell and begins casting it. The caster may move while focused. Focus is not a Stance and does not count against the Stance limit. It persists across Rounds and Lulls.
A creature may hold only one Focused spell at a time. Focusing a new spell means the held spell is lost as an interrupted casting, with no Vigor refund.
If the caster takes damage or becomes Exposed before Release, the spell is lost and the Focus cost is not refunded. Resolve the loss as an interrupted spell under the host game's preparation or slot rules.
Release uses the spell's normal host range, targets, saving throws, damage, duration, and effect. Focus 4 + Release 2 costs 6, so casting without an interruption window requires Overload. There is no fixed limit on how many spells can be released in a Round; Vigor and interruption risk are the only limits.
Three casting rhythms follow naturally:
- Split casting: Focus in one Breath and Release in a later Breath. This is Vigor-efficient but gives enemies an interruption window.
- Forced casting: Focus and Release together in one Breath through Overload. The spell is released even if the Overload check fails, after which the caster loses remaining Vigor and becomes Exposed.
- Across the Lull: Focus late in one Round, carry it through the Lull, and Release early in the next Round. If the caster takes damage in between, the spell is still lost.
Flurry Fatigue
Count every Attack maneuver a creature makes during the Round, including the attack granted by Parry & Riposte. The opportunity Attack from Interdict neither suffers Flurry Fatigue nor counts toward it.
- First Attack maneuver: no penalty.
- Second Attack maneuver: −2 to attack rolls.
- Third Attack maneuver: −4.
- Fourth Attack maneuver: −6.
- Continue at −2 per additional Attack maneuver.
Reset the count during the Lull. A complete multiattack routine is one Attack maneuver, not one maneuver per attack roll.
Speed Effects
Host effects that alter action speed translate into Vigor costs; everything else those effects do stays as written.
- Haste: halve all Vigor costs, round up, minimum 1. Identical Haste effects do not stack.
- Slow: double all Vigor costs.
Apply a maneuver's base cost, then additive Zone modifiers, then Haste or Slow, then round up and enforce the minimum cost of 1.
Only the following may cost 0 Vigor: triggering a prepaid Readied reaction, ending a Stance, and an ability that explicitly says it costs 0. All other reductions stop at 1.
3. Readied and Improvised Reactions
A reaction interrupts the Count the moment its trigger occurs. Resolve the reaction and deduct any Vigor it spent, then return to the interrupted maneuver; when that Breath ends, recompare the Count.
A basic or opportunity Attack is a single attack roll with a weapon the creature wields—not a complete multiattack routine—and costs no Vigor.
Readied Reactions
During a Breath, choose one reaction technique and prepay its Readied cost. You now hold one use of that exact reaction.
- Triggering it later costs 0 Vigor because it was prepaid.
- A creature may have only one Readied reaction at a time.
- An unused Readied reaction expires at the start of that creature's next Breath or at the Lull, whichever comes first.
- The prepaid cost is never refunded.
Improvised Reactions
A creature without the needed Readied reaction can still pay at the trigger, as long as it has enough Vigor left. The Improvised cost is 1.5 times the Readied cost, rounded up.
| Reaction | Requirement | Readied | Improvised | Trigger and effect |
|---|---|---|---|---|
| Guard | Any creature | 1 | 2 | Before an attack roll against you, improve your AC by 4 for that attack only: +4 ascending or −4 descending. |
| Parry & Riposte | Wielding a melee weapon; melee attack only | 2 | 3 | Before the attack roll, improve your AC by 2: +2 ascending or −2 descending. If the attack misses, immediately make one basic Attack; Flurry Fatigue applies. |
| Interdict | Wielding a polearm or spear | 2 | 3 | When an enemy enters your Zone, including across an engagement line, immediately make one opportunity Attack. On a hit, deal normal damage and stop the entry. The enemy's movement cost remains spent. |
Guard is the most efficient protection, but it puts no pressure back on the attacker. Parry & Riposte trades half that protection for an immediate attack whenever the incoming blow misses. Interdict does not defend against a hit at all; it spends Vigor to threaten a route.
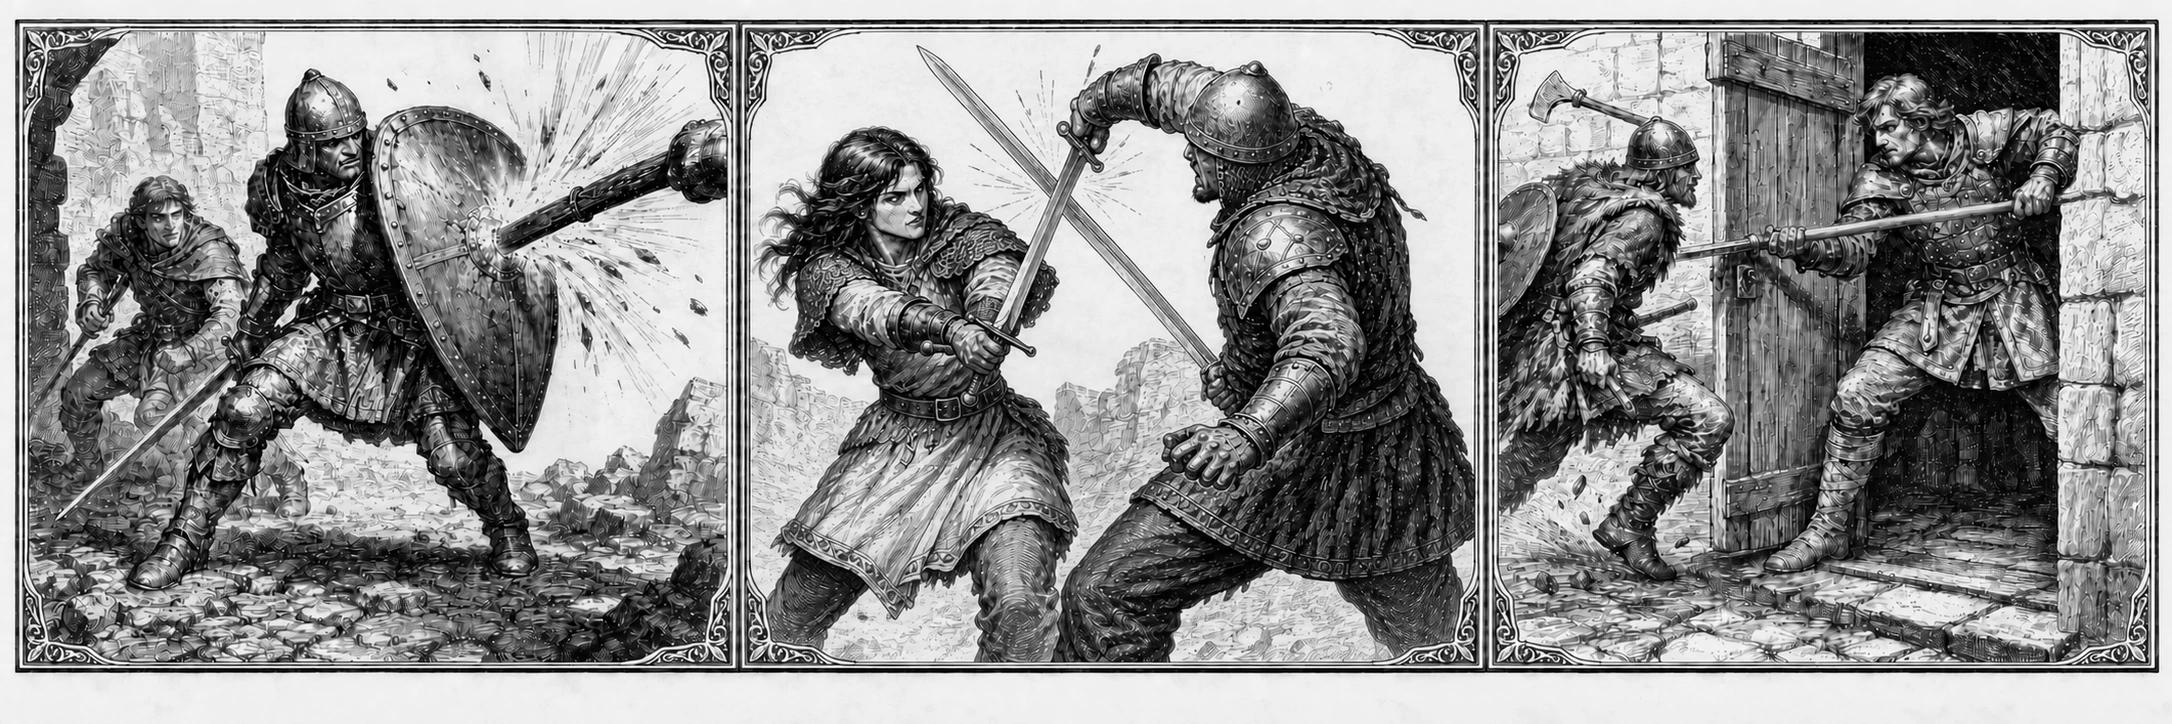
Interdict cannot trigger against an enemy already in the same Zone, and it does nothing against a ranged attack. If no one approaches before it expires, its prepaid cost is lost.
Reaction Limits
- A creature may use only one defensive reaction—Guard or Parry & Riposte—against a single individual attack roll. A multiattack routine can open a new reaction window for each roll if the defender can pay for each reaction.
- Interdict uses a separate movement trigger, so the same sequence of events can trigger Interdict at the entry and a defensive reaction against a later attack.
- Declare Guard or Parry & Riposte before the attack roll. A revealed die result, attack total, or AC comparison closes the reaction window.
- The target of a Perfect Ambush may use no reaction against it.
- Reaction costs do not count against the Breath Limit because they are paid outside the reacting creature's Breath.
- The riposte counts as an Attack maneuver for Flurry Fatigue and any optional per-Round Attack limit; the Interdict attack does not.
4. Rounds and Lulls
One WarZone Count Round is one combat round in the host game. Spell durations, torches, hazards, and other round-based effects all run on that one-to-one scale.
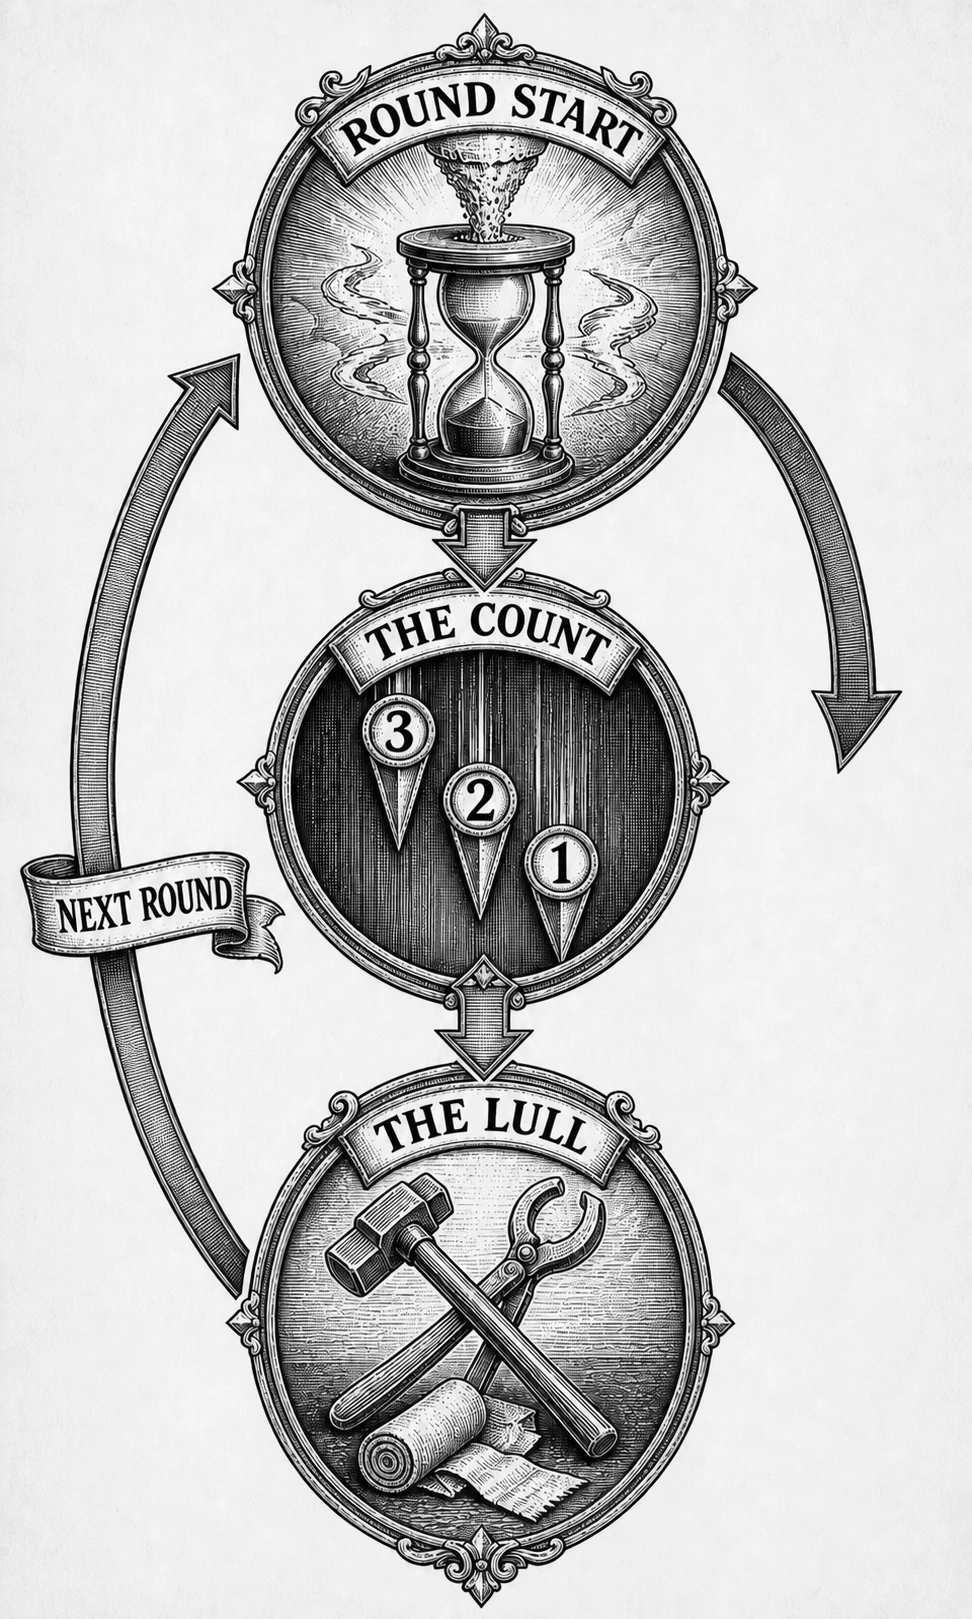
ROUND START
  1. Reset each participant to Maximum Vigor.
  2. Apply carryover penalties.
  3. Maintained Stances remain in place.
        |
        v
THE COUNT
  Highest remaining Vigor takes a Breath.
  Spend Vigor, resolve reactions, and compare again.
  Continue until every participant has 0 Vigor.
        |
        v
THE LULL
  1. End Exposed.
  2. Discard unused Readied reactions. Focus remains.
  3. Reset Flurry Fatigue and other "per Round" counts.
  4. Each unit takes one maintenance choice.
  5. Advance Zone hazards and environmental effects.
  6. Check whether the combat has ended.
        |
        +---- if not, begin the next Round
Maintenance Choices
During the Lull, each creature or unit may take one of the following:
- Reload: reload one crossbow or firearm. If a Squad takes this choice, it reloads the weapons of all its current members instead.
- First aid: use the host game's healing or stabilization procedure on a fallen ally.
- Rally: choose one subordinate Squad that is retreating or fleeing after a failed morale check; it tests morale again, and on a success it returns at the start of the next Round.
- Change gear: ready, stow, or exchange equipment as the host game permits.
The Lull is a maintenance window, not Vigor recovery; Vigor returns at the next Round start.
Once maintenance is done, advance fire, poison fog, flooding, collapsing structures, and any other Zone hazards. Wandering-monster checks and exploration-turn procedures stay on the host game's normal clock.
Combat ends when a side is destroyed, flees, or collapses under morale; when the objective is achieved; when the remaining participants withdraw; or when the table agrees the danger is over.
5. Zone Battlefields
A Zone is a place where position has one tactical meaning. A battlefield is a small graph of Zones connected by movement routes. Three to six Zones are enough for most fights; five is the usual sweet spot.
The default eight-Zone graph is a starting point you can reuse:
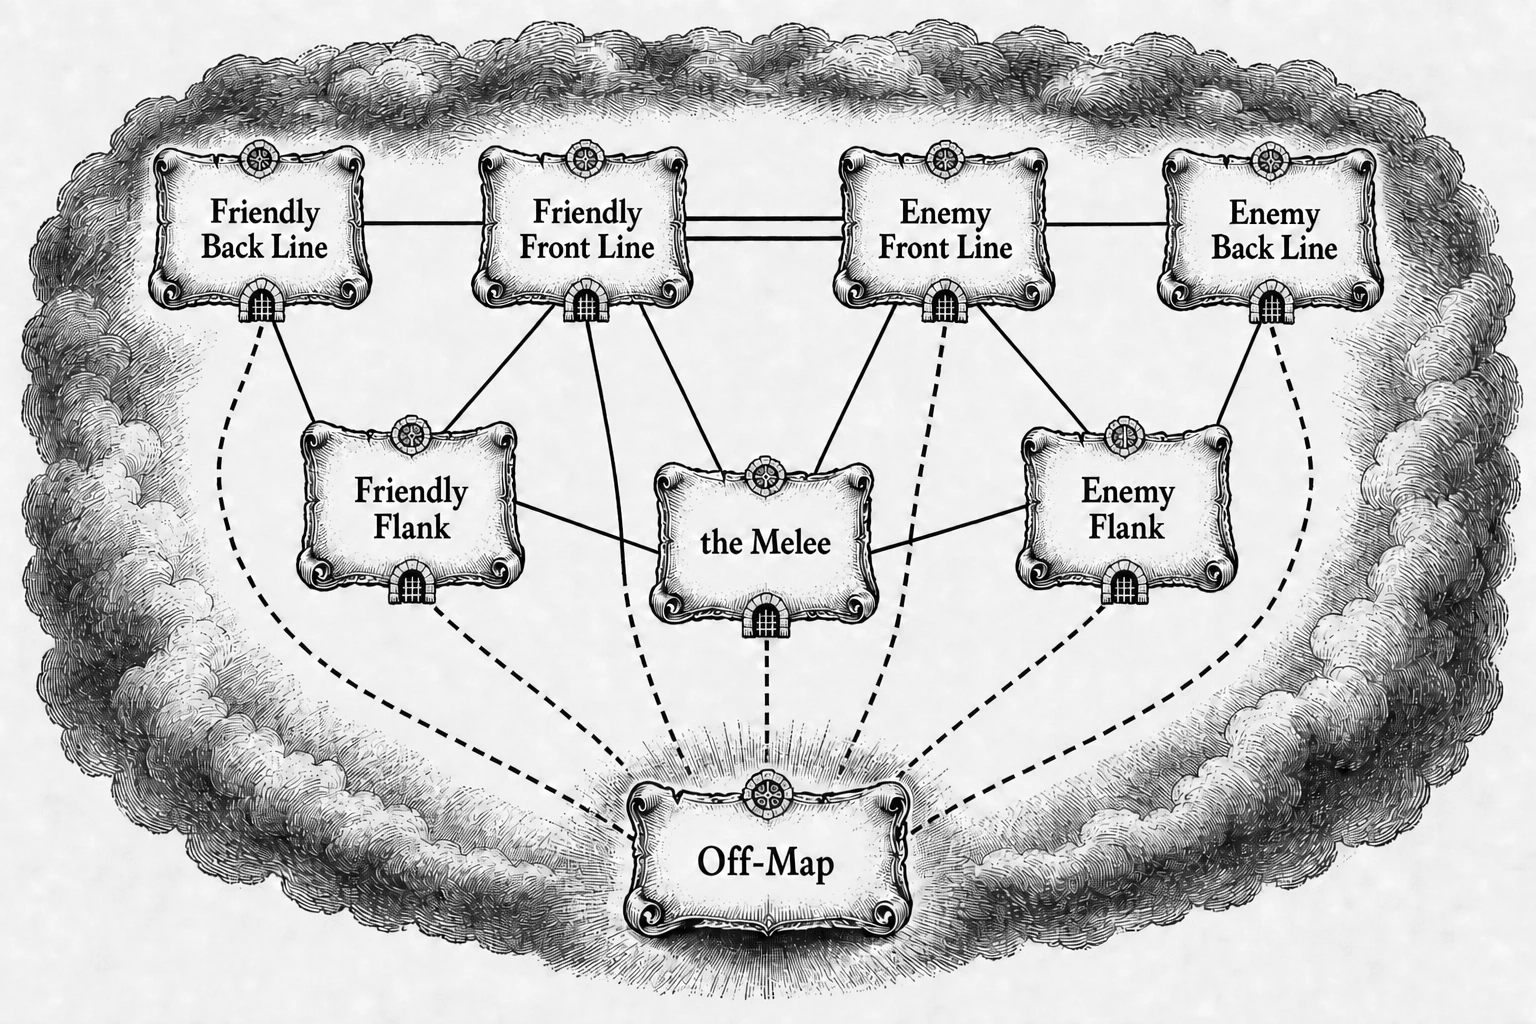
[Friendly Back Line]──[Friendly Front Line]⇌[Enemy Front Line]──[Enemy Back Line]
          │                    │       \       /       │                 │
[Friendly Flank]───────────────┘      [the Melee]      └────────[Enemy Flank]
          └────────────────────────────┘  └─────────────────────────────┘

[Off-Map] connects to every Zone, but only through an access gate.
Use these edge symbols in maps:
| Symbol | Meaning |
|---|---|
── | ordinary adjacent movement |
⇌ | a direct engagement line: an ordinary movement edge that melee attacks can also cross without moving |
↕ | a vertical or separate connecting passage |
x | blocked by default |
The diagram gives you a procedure; it does not dictate what the place looks like. Rename, remove, merge, and reconnect its nodes until the graph matches wherever the encounter actually happens.
Range
- Melee: same Zone or across a direct engagement line.
- Very short, about 10 feet: same Zone.
- Short, about 30 feet: an adjacent Zone.
- Medium, about 120 feet: up to two Zone edges away.
- Longer ranges: up to three Zone edges away.
Where the host game gives outdoor ranges in yards, read the same listed numbers as yards. Do not add range-band attack penalties; in this module, firing position and Zone traits supply the modifiers. If you skip module 5, use the host game's ranges unchanged.
Movement Costs
Breakthrough, entering the Melee, and Forced Exit each replace the Move cost for that movement. Zone entry surcharges add on top of whichever movement cost applies. Rush may replace the Move component for +1 Vigor. All of these count as moving.
Zone Roles and Traits
| Zone | Rules |
|---|---|
| Front Line | Polearm and spear attack rolls gain +1. Dagger attacks suffer −1. Cavalry charges can be made only here. Melee attacks may cross its engagement line. |
| Back Line | Ranged attack rolls gain +1. If no enemy has entered, hostile melee attacks cannot reach occupants. Reload costs 1 less Vigor. |
| Flank | Improve stealth by +20 percentage points, by +1 on an x-in-6 chance, or by one difficulty step. A class with no stealth ability makes a Standard DEX check (roll-under DEX / DC 10). Squad commands cost +1 Vigor here. |
| the Melee | Dagger and unarmed Attack costs fall by 1, minimum 1. Polearm and two-handed Attack costs rise by 1. Grapple checks gain +2 under the host convention. Formation and Stance benefits are suppressed. |
| Off-Map | Entry costs a normal Move and requires an access ability such as successful stealth, flight, invisibility, or a listed module tag. Occupants cannot be targeted directly. A creature in Off-Map cannot attack, cast, or otherwise affect creatures on the map while it remains there. To act against the battlefield it must Move out, and Move + Attack in the same Breath is a Perfect Ambush. |
| High Ground | Ranged attack rolls gain +2. Melee attack rolls against an occupant suffer −1. The route into the Zone either costs +1 Vigor or requires a Standard check (roll-under relevant ability / DC 10), as marked on the map. A failed check spends the Move cost and prevents entry. |
| Underwater | Firearms and flame cannot be used. Move costs +1 Vigor. Grapple checks gain +2 under the host convention. |
Control matters only for the attack-roll bonuses and Vigor discounts granted by the Front Line, Back Line, Flank, and High Ground. Protections (the Back Line's melee safety, Off-Map's protection from direct targeting), all penalties, and every modifier of the Melee and Underwater apply to every occupant regardless of Control. A Contested Zone grants neither side the gated bonuses or discounts.
Host cavalry charge. Combine a Move or Rush with one Attack maneuver in the same Breath, paying the listed cost for each, and apply the host game's charge bonuses to that Attack.
Ambush Routes
The host game's encounter surprise rule remains unchanged. Zones add ways to create surprise after combat has begun.
Ambush. A creature that succeeds on stealth in a Flank may Move and Attack from concealment, and its first attack gains +2. If that attack also qualifies for a host backstab or equivalent feature, use the host feature and do not add this +2.
Perfect Ambush. A creature with access may enter Off-Map. A Move + Attack from Off-Map gains +2 and permits no reactions from the target. The attacker still pays the normal movement and Attack costs. Nothing may attack an Off-Map creature directly.
Firing into the Melee
You can fire ranged attacks into the Melee from outside it. On a miss, roll d6. On a 1–2, the shot automatically hits one random ally in the Melee; do not roll to hit again, but roll normal host damage. Ranged attacks cannot be made from inside the Melee.
Pincer
A side creates a Pincer against a target Zone only when both conditions are met in the same Round:
- The side occupies two different Zones adjacent to the target Zone.
- During the Round, combatants in each of those two Zones complete at least one Attack maneuver against creatures in the target Zone.
Once the second condition is met, combatants in each arm of the Pincer gain +2 on attacks into the target Zone for the rest of the Round. While the Pincer holds, the defenders suffer −1 on morale checks. Every movement that leaves the target Zone requires a Hard check (roll-under relevant ability −4 / DC 14); if that movement already required a check, make it one step harder instead.
A Pincer must be earned again each Round. Position alone is not enough.
Simple Control
At each Zone, compare combat-capable bodies:
- A player character counts as 2 bodies, regardless of level.
- An individual of HD 4 or more counts as 2 bodies.
- Any other combat-capable individual counts as 1 body.
- Never count the same creature twice.
The side with more bodies has the Zone Controlled. Equal totals make it Contested. Recalculate only at the start of a Round, when a creature enters or leaves, when a creature is defeated, or when a body-count or Control-contribution modifier begins or ends. Do not stop after every Breath to recount.
Control matters only for the attack-roll bonuses and Vigor discounts granted by the Front Line, Back Line, Flank, and High Ground. Protections, all penalties, and every modifier of the Melee and Underwater apply regardless of Control.
Breakthrough
Moving into an enemy-Controlled Zone is a Breakthrough. Pay 3 Vigor and make a Standard STR check (roll-under STR / DC 10).
- If the defenders count at least twice as many bodies as the entering creature does, make a Hard STR check (roll-under STR −4 / DC 14).
- If a narrow route is blocked, make a Dire STR check (roll-under STR −8 / DC 18).
Use the hardest difficulty that applies. On a failure, the movement cost is spent, the creature does not enter, and it becomes Exposed.
On a success, resolve any Interdict triggered by the entry before placing the mover in the destination Zone. A successful Interdict hit cancels the entry but does not refund the spent Breakthrough cost.
Entering and Leaving the Melee
The Melee is never subject to Breakthrough. Always use its own entry and exit procedures, even when the Melee is enemy-Controlled.
Enter. Pay 2 Vigor. A thief, another class built for stealth or light skirmishing, a creature with [Scrapper], or a creature wearing no more than leather armor and carrying no shield enters without a check. Everyone else makes a Standard check (roll-under relevant ability / DC 10). On a failure, the cost is spent, the entry fails, and the creature becomes Exposed.
Leave. Choose one method:
- Pay 2 Vigor and make a Standard check (roll-under relevant ability / DC 10). On a failure, the movement fails and the creature becomes Exposed.
- Make a Forced Exit for 4 Vigor without a check.
This is by design: the Melee is cheap to enter and costly to leave safely.
Capacity
A narrow path may have a Capacity of 2–4 creatures. Once one side fills the Capacity, it blocks the route, and opponents may enter only with a Dire Breakthrough.
If the Breakthrough succeeds and no Interdict stops the entry, the mover enters and the Zone is over Capacity; no further creature may enter until occupancy falls below Capacity.
Leaving the Battlefield
A creature may leave the battlefield from its own Back Line or Flank for 3 Vigor. If no enemy is adjacent, it succeeds. If an enemy is adjacent, compare host movement rates:
- If the withdrawing creature is faster, it succeeds automatically.
- If its speed is equal or lower, make a Standard check (roll-under relevant ability / DC 10).
On a failure, the creature becomes Exposed, loses all remaining Vigor, and begins the next Round with −3 Vigor from exhaustion.
Editing the Battlefield
Build a battlefield with six operations:
- Remove a Zone to create a last stand or cut off retreat.
- Block an edge with a door, collapse, fire, or other obstacle.
- Set Capacity on a bridge, gate, stair, or tunnel.
- Add a Zone for an objective, route, hazard, or new phase.
- Merge Zones when a line collapses or distance stops mattering.
- Add a special effect using host saves, damage, or a module check.
Topology can be the victory condition. Reaching a ritual circle, holding a bridge through the Lull, opening a blocked edge, or escaping through a Back Line can matter more than reducing every enemy to 0 HP.
A giant monster may itself be a battlefield: its limbs, back, and head become Zones connected by climbing routes. These Zones do not create separate HP pools unless the host stat block already has them. Attacks still resolve against the host monster; the Zone graph governs access and objectives.
Optional Module 1: Detailed Control
Use this option when formations and unequal forces deserve more precision than the core body count gives them. It replaces Simple Control and uses the same recalculation triggers.
Control Contributions
| Unit | Control contribution |
|---|---|
| 0-level or HD ½ creatures | 1 per two, rounding up; three contribute 2 |
| One full HD 1 Squad | 2; 1 below half strength |
| One full HD 2–3 Squad | 3; reduce proportionally as members are lost, rounding up |
| One individual of HD 4 or more | 4 |
| One leader below HD 4, or one player character | 2 |
If a creature qualifies for more than one row, use only one of them. A non-PC leader of HD 4 or more uses the HD row and contributes 4. A player character always contributes 2; do not add an HD contribution.
Add these bonuses where they apply:
- A rank of polearms set in a Front Line adds +1.
- Holding Stance: spend 2 Vigor for +2 Control through the current Round. This counts as a Stance, so a creature can maintain only one Stance at a time. The unit cannot move voluntarily during the Round; if it moves involuntarily or becomes Exposed, the Stance ends. Otherwise it ends during the Lull.
- Shield Wall: multiply that Squad's Control contribution by 1.5 and round up.
- A leader's positive CHA modifier adds to their side's total in the Zone. Count only the single highest positive CHA modifier on each side in that Zone.
Compare the two totals. The higher side Controls the Zone; equal totals make it Contested.
Total Control
A side that leads by 5 or more has Total Control. A Breakthrough into that Zone is Hard (roll-under STR −4 / DC 14). If a narrow route is also blocked, it is Dire (roll-under STR −8 / DC 18).
Total Control replaces the Simple Control rule that makes a Breakthrough Hard at two-to-one bodies.
Detailed Control in the Melee
In the Melee, ignore polearm fronts, Holding Stance, Shield Wall, CHA auras, and all other Control bonuses; compare base contributions only, and use the normal recalculation triggers.
Optional Module 2: Squads
A Squad is three to six identical monsters, retainers, or mercenaries acting as one organized block.
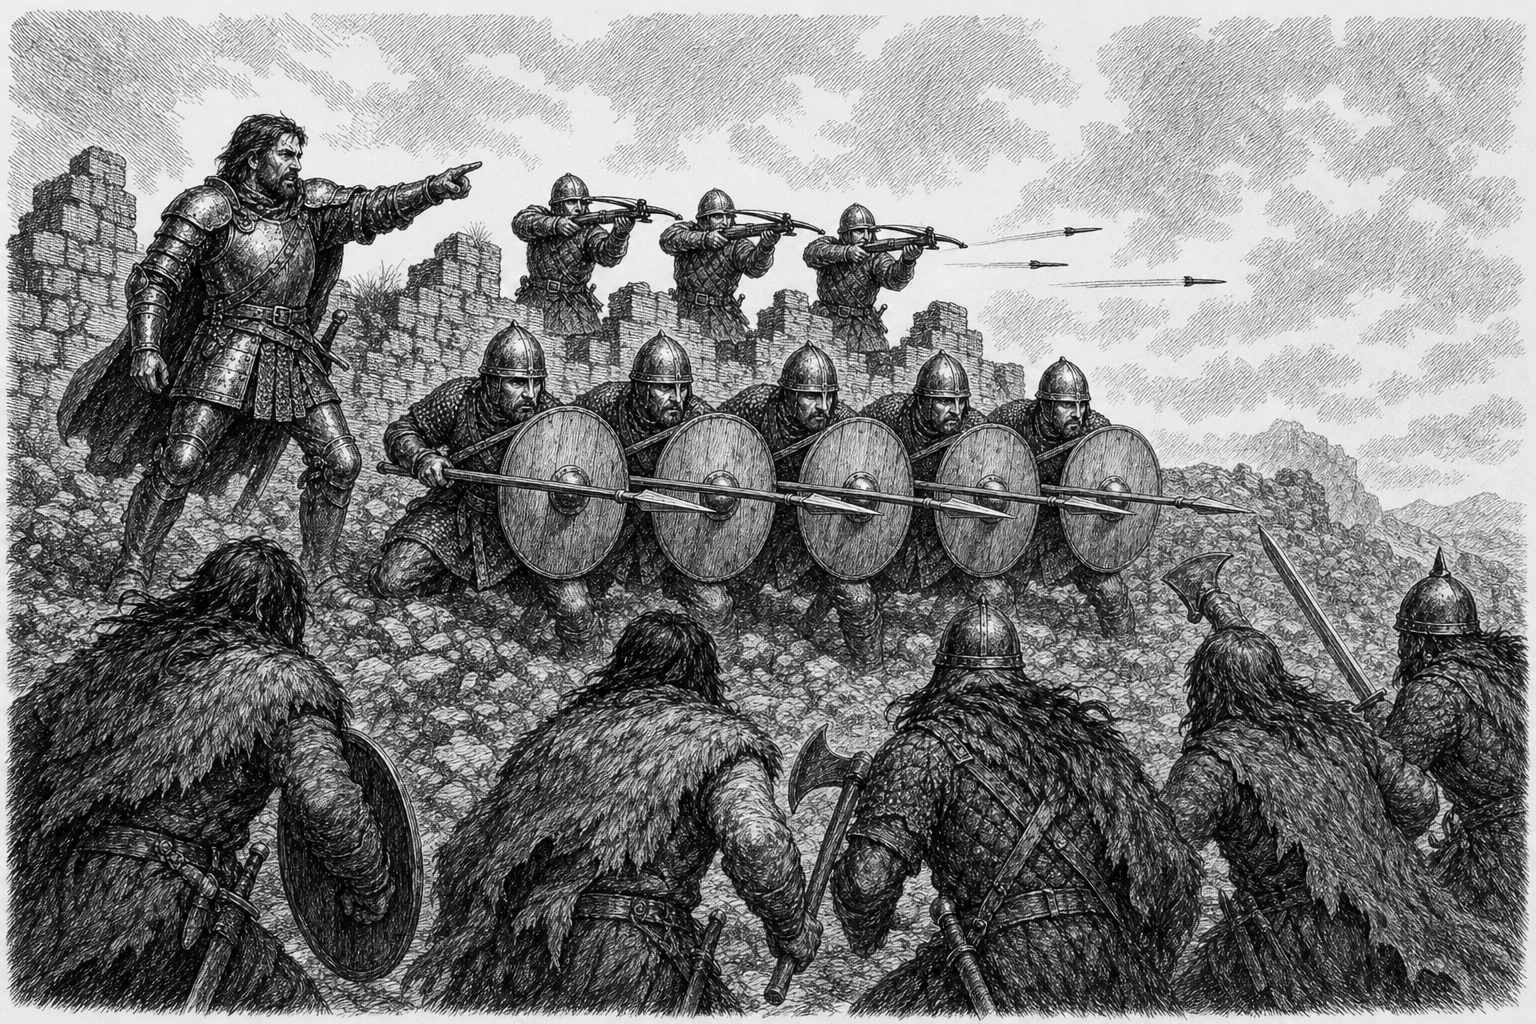
- Track movement, morale, and Control once for the whole Squad.
- Keep the host game's attacks, damage, HP, saves, and casualties individual.
- Squad members have no individual Vigor and cannot use reactions. A Squad's defense is its formation—Shield Wall, position, and the host game's AC and HP.
- Members do not take separate Count activations; the Squad acts when a leader commands it.
If Detailed Control is not in use, a Squad in Shield Wall counts as 1.5 times its current number of bodies, rounded up, for Simple Control.
Command
A leader spends Vigor during its Breath to activate one Squad and resolve one order immediately.
- Base Command cost: 2 Vigor.
- A player character with INT or CHA +2 or better pays 1 Vigor.
- A monster leader of HD 4 or more pays 1 Vigor.
Each Command issues one of these orders:
| Order | Resolution |
|---|---|
| Advance | Move the Squad to one adjacent Zone. |
| Volley | Make the Volley attack below. |
| Enter the Melee | Move the Squad into the Melee, using the normal entry rule. |
| Shield Wall | Form a Shield Wall through the current Round. The Squad cannot move that Round; the Shield Wall ends during the Lull. |
| Retreat | Move the Squad one Zone toward its own Back Line or Flank. |
The leader pays the Command cost; the Squad pays no Vigor of its own for the ordered movement or attack.
If an ordered movement would take the Squad into an enemy-Controlled Zone, the Squad makes the required Breakthrough or entry check as a single unit. The Command cost already covers that movement, so the Squad pays no additional Vigor. On a failure, the Squad does not enter.
A leader may issue more than one Command in a Breath, as long as the total cost fits the Breath Limit, and the same Squad may receive more than one Command in a Round. Each Volley after that Squad's first in the Round takes cumulative Flurry Fatigue on its shared attack roll. Reset the Squad's Volley count during the Lull.
Volley
A Squad of N identical missile troops makes one attack roll, using its troops' ordinary attack value from the host game.
- On a hit,
ceil(N / 2)missiles hit. Roll the host game's damage separately for each hit. - On a miss, none hit. If the Volley was fired into the Melee, resolve the normal friendly-fire rule once.
If your table prefers individual attack rolls, use them instead. That is slower, but no other Squad rule changes.
Morale Triggers
Keep the host game's morale system, and add an immediate morale check when a Squad:
- falls to half its starting members;
- loses its leader;
- suffers a Pincer;
- is ordered into the Melee; or
- has its Back Line overrun.
Each applicable trigger applies −1 to a 2d6 morale check. In a percentile morale system, read each −1 as −5 percentage points. When several triggers fire at once, their modifiers can stack.
A Back Line is overrun when an enemy Controls it. The Pincer trigger uses the Pincer's existing −1 morale modifier rather than adding a second −1.
Without a Commander
When its leader falls, a Squad immediately checks morale. Until a new leader takes command, it takes one leaderless action at the very end of each Round's Count. The leaderless action costs no Vigor and is limited to one Move or one Attack maneuver.
A Squad is engaged while an enemy occupies its Zone or can melee it across an engagement line:
- If engaged, it keeps fighting the nearest enemy.
- If not engaged, roll d6. On an odd result it holds position; on an even result it flees toward its own Back Line or Flank.
This simple behavior requires no Command; its only job is to keep a leaderless Squad moving toward a morale outcome.
Optional Module 3: Stances
A Stance is a small content socket for a weapon style, class, monster, or battlefield role.
- A creature may maintain one Stance at a time.
- Declaring a Stance costs 1 or 2 Vigor, as listed.
- Ending a Stance costs 0 Vigor.
- A Stance persists across Breaths, Lulls, and Rounds.
- Moving—voluntarily or not—ends the Stance.
- Becoming Exposed ends the Stance and prevents another until Exposed ends.
This module includes only three examples. New Stances should remain compact, bind the user to a position, and use the host game's attack or AC language rather than creating a second resolution engine.
| Stance | Cost | Effect |
|---|---|---|
| Spearwall | 2 | Front Line only. With Detailed Control, gain +2 Control; with Simple Control, count as +2 bodies. Gain +2 on attack rolls against charging cavalry. |
| Ironwall | 1 | Improve AC by 1: +1 ascending or −1 descending. You cannot move voluntarily while maintaining it. |
| Pressure | 2 | Enemies in your Zone suffer −1 on attack rolls. |
Spearwall grants either its Detailed Control benefit or its Simple Control benefit, never both at once.
Tuning the Pace
WarZone Count preserves the host game's attack math, but not its number of attacks per round. The module speeds combat up on purpose.
At Vigor 10, a stable normal-weapon Breath can hold Move + Attack + Readied Guard, or two Attacks + Readied Guard. A combatant who spends the entire Round attacking can make five normal Attack maneuvers (Breaths of 4 + 4 + 2 Vigor). At a 50% base hit chance, those five attacks yield roughly 1.5 expected hits once Flurry Fatigue is applied—about 3 times one stock attack. Two Attacks under the first fatigue penalty come to about 1.8 times one stock attack.
High-accuracy combatants get more out of the extra attacks than low-accuracy ones. Low-level combat becomes especially lethal, because HP is small and the highest-Vigor side can act first more than once. When you describe the module to players, call it faster and more dangerous; it is not balance-neutral.
Heavy attacks remain slower: a Vigor 10 creature can normally make at most three heavy Attack maneuvers across a Round, and never two in one Breath.
Campaign Levers
Use one lever at a time, then reassess.
- Low-level Attack cap: no creature may make more than two Attack maneuvers per Round. Recommended for level 1–3 campaigns that want a pace closer to stock play.
- Sharper fatigue: Flurry Fatigue accumulates at −3 instead of −2.
- Slower normal attacks: a normal Attack costs 3 Vigor instead of 2, which removes the two-Attacks-plus-Guard package.
- Monster Attack cap: a monster may make at most
1 + ceil(HD / 4)Attack maneuvers per Round. Useful when a high-HD multiattack routine becomes too dominant. - Dramatic Zones: double every Zone modifier. A +1 becomes +2, and a −1 becomes −2.
- Spell brake: after Release, the caster cannot Focus again in the same Round.
Do not apply all the levers by default. The core package assumes an aggressive tempo and relies on Flurry Fatigue as its main brake.
Haste and Spell Pressure
Under Haste, Focus costs 2 and Release costs 1. Focus + Release then fits in one Breath for 3 Vigor without Overload, and a high-Vigor caster may release several spells in a Round. This is the intended translation of a host effect that doubles attack speed. If that proves too permissive for your campaign, use the spell brake above rather than changing individual spell effects.
Worked Combat: The Broken Line
This example fixes only the results needed to show the timing. Take AC, HP, attack bonuses, damage, saves, and spell details from the host game. Unless a result explicitly says otherwise, no attack, spell, or reaction defeats, moves, or incapacitates a participant before the Lull.
Battlefield and Participants
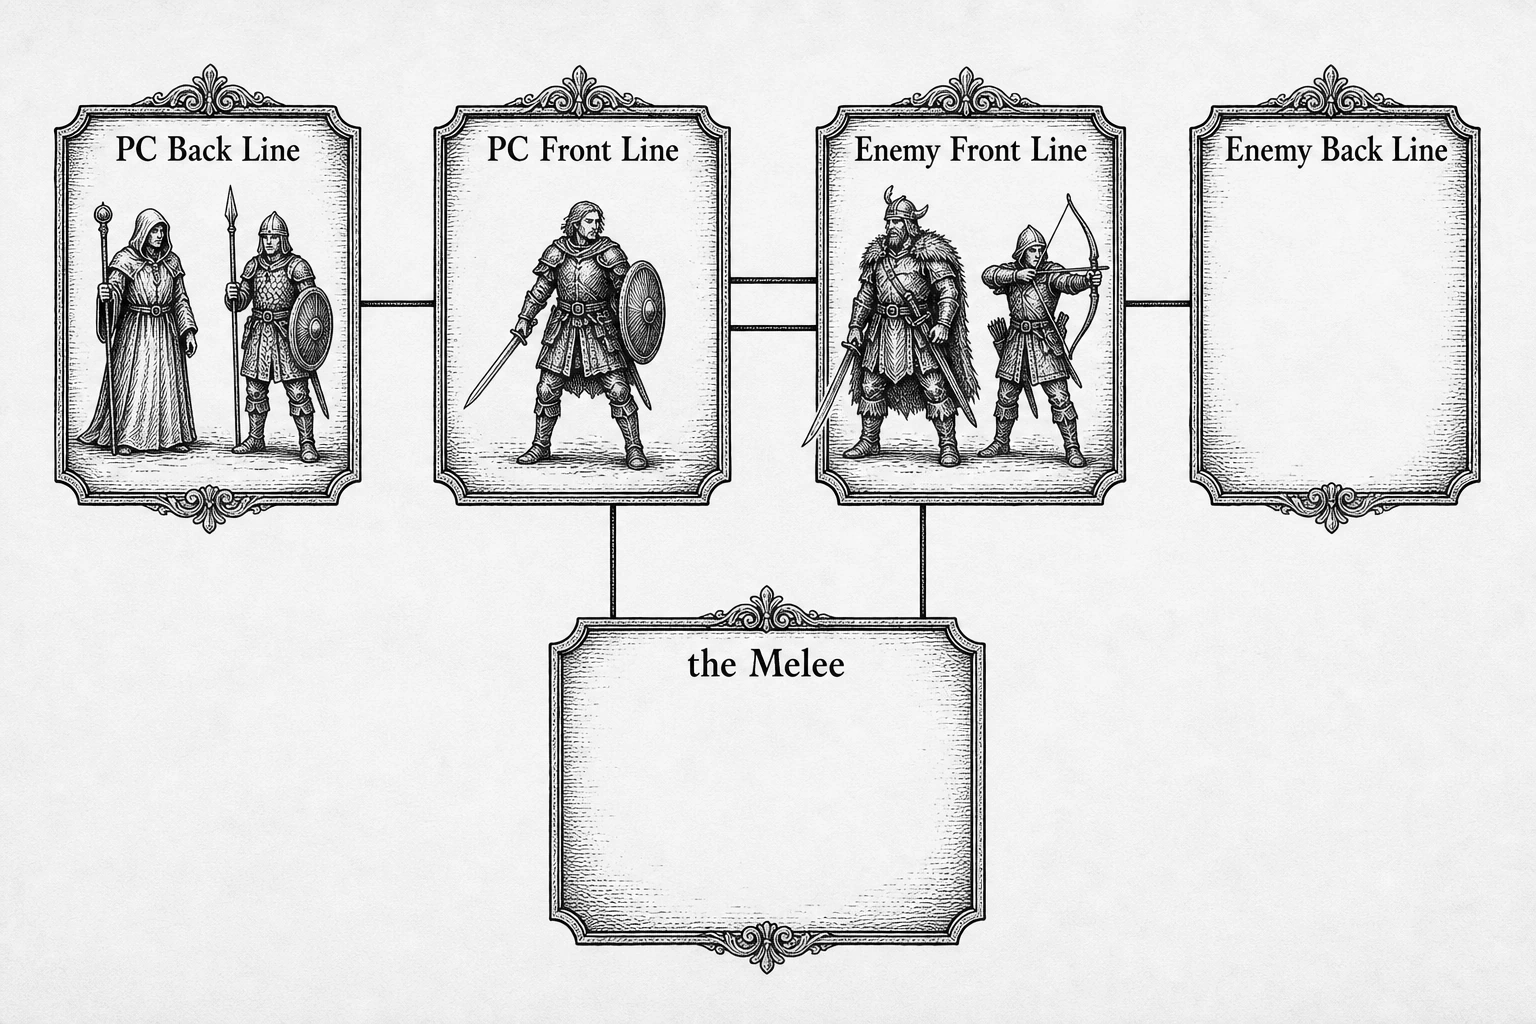
[PC Back Line]──[PC Front Line]⇌[Enemy Front Line]──[Enemy Back Line]
└────[the Melee]────┘- Sword fighter: DEX +1, Maximum Vigor 11; starts in the PC Front Line.
- Magic-user: DEX +0, Maximum Vigor 10; starts in the PC Back Line.
- Spear fighter: DEX −1, Maximum Vigor 9; starts in the PC Back Line.
- Raider captain: HD 4, Maximum Vigor 10; starts in the Enemy Front Line. Its weapon routine is heavy.
- Raider archer: HD 1, Maximum Vigor 9; starts in the Enemy Front Line.
The PC Front Line is Controlled. The sword fighter alone already counts as two bodies, so a lone raider's Breakthrough is Hard from the start; the spear fighter's arrival keeps it that way.
Round 1 Count Timeline
The “Count” column shows the acting creature's Vigor before and after its Breath. Prepaid reactions do not reduce Vigor when triggered; Improvised reactions would.
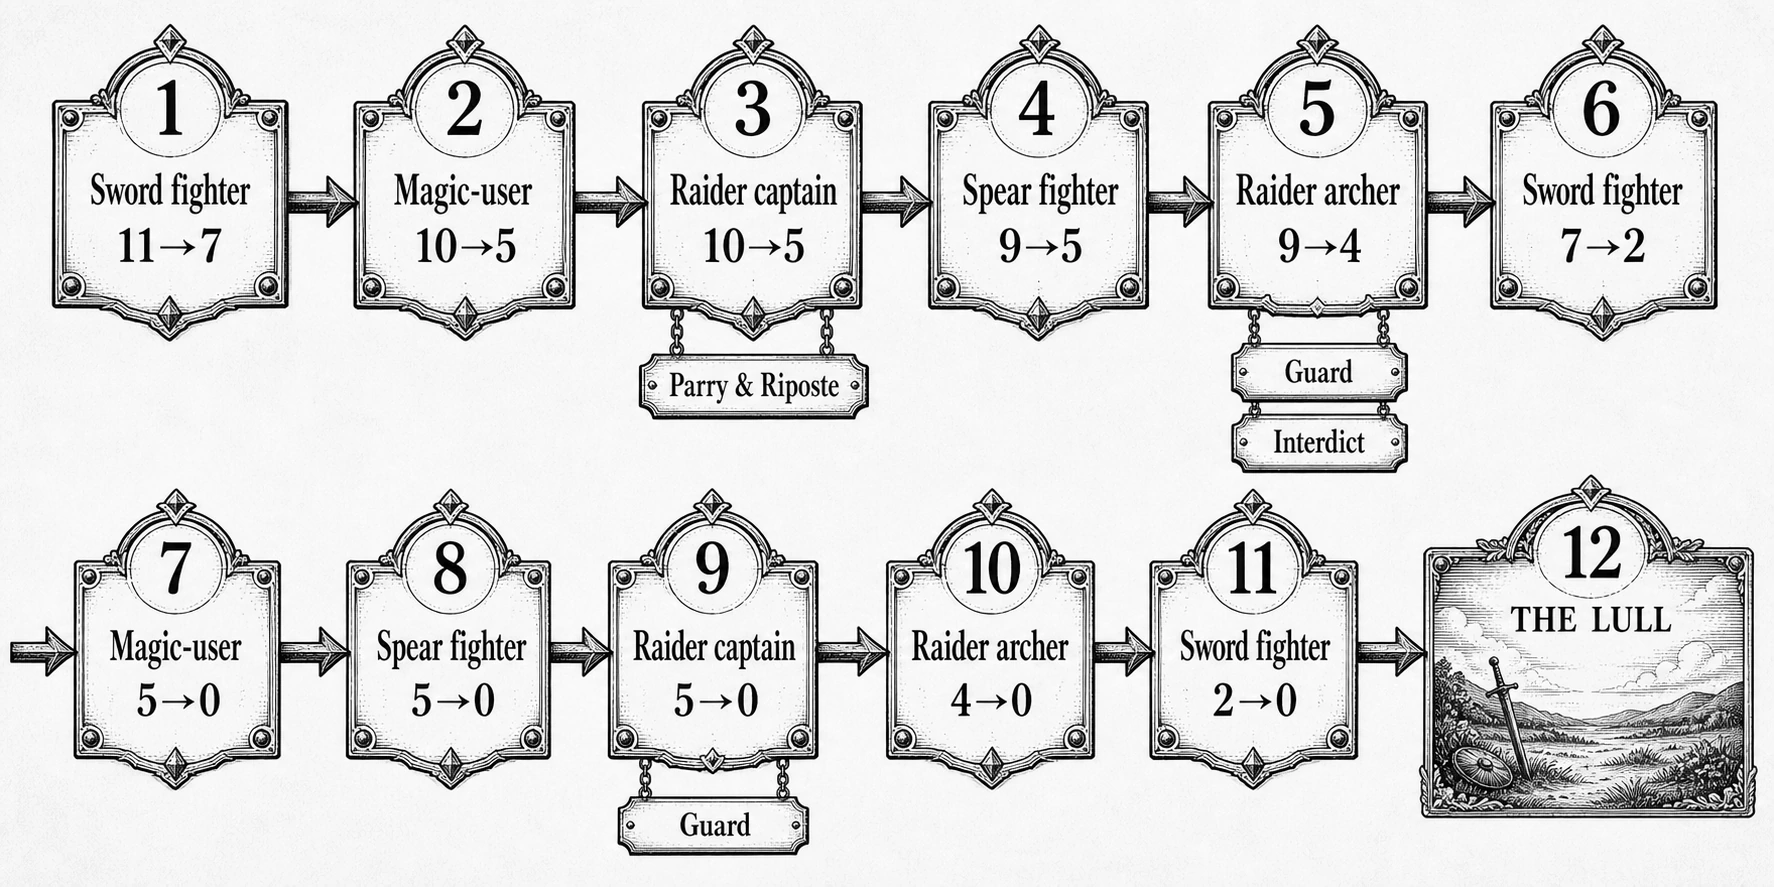
| # | Count | Breath and interruption |
|---|---|---|
| 1 | Sword fighter 11→7 | Normal Attack 2, then Readies Parry & Riposte 2. This is the fighter's first Attack maneuver. |
| 2 | Magic-user 10→5 | Focus 4, naming a spell, then Readies Guard 1. |
| 3 | Raider captain 10→5 | Heavy Attack 3 against the sword fighter, then Move 2 to the Enemy Back Line. Before the attack roll, Parry & Riposte improves the fighter's AC by 2. An attack that would have hit the unmodified AC now misses, and the fighter immediately makes a basic Attack. That riposte is the fighter's second Attack maneuver and takes Flurry Fatigue −2. |
| 4 | Spear fighter 9→5 | Move 2 into the PC Front Line, then Readies Interdict 2. |
| 5 | Raider archer 9→4 | Normal ranged Attack 2 against the magic-user, then attempts a Breakthrough 3 into the PC Front Line. The magic-user declares Guard before the shot, improving AC by 4 and turning the hit into a miss. The Hard Breakthrough succeeds, but Interdict triggers before the archer is placed in the Zone. The spear fighter hits: the archer takes normal damage, stays in the Enemy Front Line, and the 3 Vigor spent on the move stays spent. |
| 6 | Sword fighter 7→2 | Two normal Attacks for 4 against the raider archer across the engagement line, then Readies Guard 1. Counting the first attack and the riposte, these are the fighter's third and fourth Attack maneuvers, at −4 and −6. |
| 7 | Magic-user 5→0 | Release 2, resolving the spell under host rules; Move 2 into the PC Front Line; Ready Guard 1. |
| 8 | Spear fighter 5→0 | Heavy Attack 3 against the raider archer, then Move 2 back to the PC Back Line. This is the spear fighter's first Attack maneuver, so there is no Flurry Fatigue; the Controlled Front Line's polearm bonus grants +1 on the attack. |
| 9 | Raider captain 5→0 | Move 2 to the Enemy Front Line, then Heavy Attack 3 across the engagement line. The sword fighter's Guard improves AC by 4. This is the captain's second Attack maneuver and takes Flurry Fatigue −2. |
| 10 | Raider archer 4→0 | Attempts another Breakthrough 3, then Readies Guard 1. The Hard check succeeds, and with Interdict already spent, the archer enters the PC Front Line. |
| 11 | Sword fighter 2→0 | Move 2 to the PC Back Line. Every participant is now at 0. |
The Lull
Resolve the Lull in order:
- End any Exposed condition.
- Discard the magic-user's and archer's unused Guard. The spell has already been Released; any active Focus would persist.
- Reset Flurry Fatigue and other per-Round counters for the coming Round.
- Each unit takes one maintenance choice. The archer might change gear; the PCs might use first aid.
- Advance any battlefield hazard and check whether morale, retreat, or the objective ends the fight.
If the fight continues, everyone resets to Maximum Vigor at the start of Round 2. The Lull itself did not restore Vigor.
What the Example Demonstrates
- After every Breath, the participant with the highest remaining Vigor is selected again.
- A Readied reaction is prepaid and can interrupt another creature's Breath.
- Guard and Parry & Riposte are declared before the attack roll.
- Interdict resolves after the entry gate succeeds, yet it can still stop the actual placement; the movement cost stays spent.
- The riposte counts toward Flurry Fatigue; the Interdict opportunity Attack does not.
- Focus, Release, movement, attacks, and reactions all share one Vigor economy, while the host game resolves each of them as usual.
Monster and Faction Overlays
Use the host bestiary entry unchanged. Each overlay adds only Vigor, module tags, and a tactical pattern; apply the same pattern to any equivalent creature in another bestiary.
1. Burrowing Ambusher
Host stat block: any worm, tunneling predator, or other burrowing hunter, unchanged.
Vigor: 8 + ceil(HD / 2), maximum 13.
Module tag: [Off-Map Access] while burrowing.
Begin the creature Off-Map if the host ability plausibly allows an underground approach. It pays the normal Move and Attack costs to emerge into any reachable Zone, and that Move + Attack becomes a Perfect Ambush, granting +2 and denying its target any reaction. After the strike, it can spend later Breaths moving toward another access route, though burrowing does not erase the host creature's limits. To move this overlay onto another creature, treat its hidden movement mode as an Off-Map gate; nothing else about the stat block needs to change.
2. Pack Hunters
Host stat block: goblins, wolves, giant rats, or another numerous low-HD creature, unchanged.
Vigor: calculate once from HD for every identical member.
Module tag: [Scrapper] for creatures that should enter the Melee without a check.
Split a loose pack into two Mob Activation groups and send them through different Zones. To earn a Pincer, each group must attack the same target Zone in one Round; standing on both sides is not enough by itself. Their numbers also make Simple Control easy to read without new arithmetic. The reusable part is the split: one large mob becomes two positional threats, instead of every body taking its own isolated turn.
3. Dragon
Host stat block: any HD 9+ dragon, unchanged.
Vigor: 13.
Module tags: [Off-Map Access] while flying, if the host creature can leave ordinary reach.
Treat the dragon's host attack routine as one heavy Attack unless the GM classifies a lighter routine separately. Its breath targets one whole Zone, keeping the host's save, damage, frequency, and immunity rules as written. Dragon-fear and morale likewise follow the host game's rules, and the module's Squad morale triggers stack with that terror. With Detailed Control, the dragon contributes 4 and can spend 2 Vigor on Holding Stance for +2, establishing Total Control over an otherwise empty lair Zone until opposition enters. For a set-piece fight, make the dragon itself a Zone map as shown below, without inventing separate HP pools.
4. Centaur Band
Host stat block: centaurs or equivalent fast cavalry, unchanged.
Vigor: calculate from each creature's HD.
Module tags: none required.
Use Rush to cross one Zone and gain +1 on the next attack that Round. Cavalry charges only come from a Front Line, so the band must hold that route — or retake it — rather than circle around at no cost. Split riders between a Front Line and Flank to threaten a Pincer, or force a Breakthrough when the line is Controlled. The pattern carries to any bestiary: host movement speed becomes access and retreat advantage, while Vigor prices the actual maneuver.
5. Mercenary Company
Host stat blocks: one HD 4+ captain, one Squad of three to six spearmen, and one Squad of three to six crossbowmen, all unchanged.
Vigor: calculate the captain normally; the organized Squads act through Command under this option.
Module tags: none required.
Place the spearmen in the Front Line and the crossbowmen in the Back Line. The captain acts in person with Interdict or Holding Stance and spends later Breaths to Command a Shield Wall, Advance, or Volley. The crossbow Squad can Reload during the Lull before another Volley. Control keeps the formation legible, but losing the leader tests morale immediately and can leave both Squads without direction. To port the company, all it takes is a leader and two differently tasked blocks; no bespoke army subsystem is required.
Three Battlefield Templates
Each template is small on purpose: you can redraw it on an index card.
A. The Gate Bridge — Bottleneck
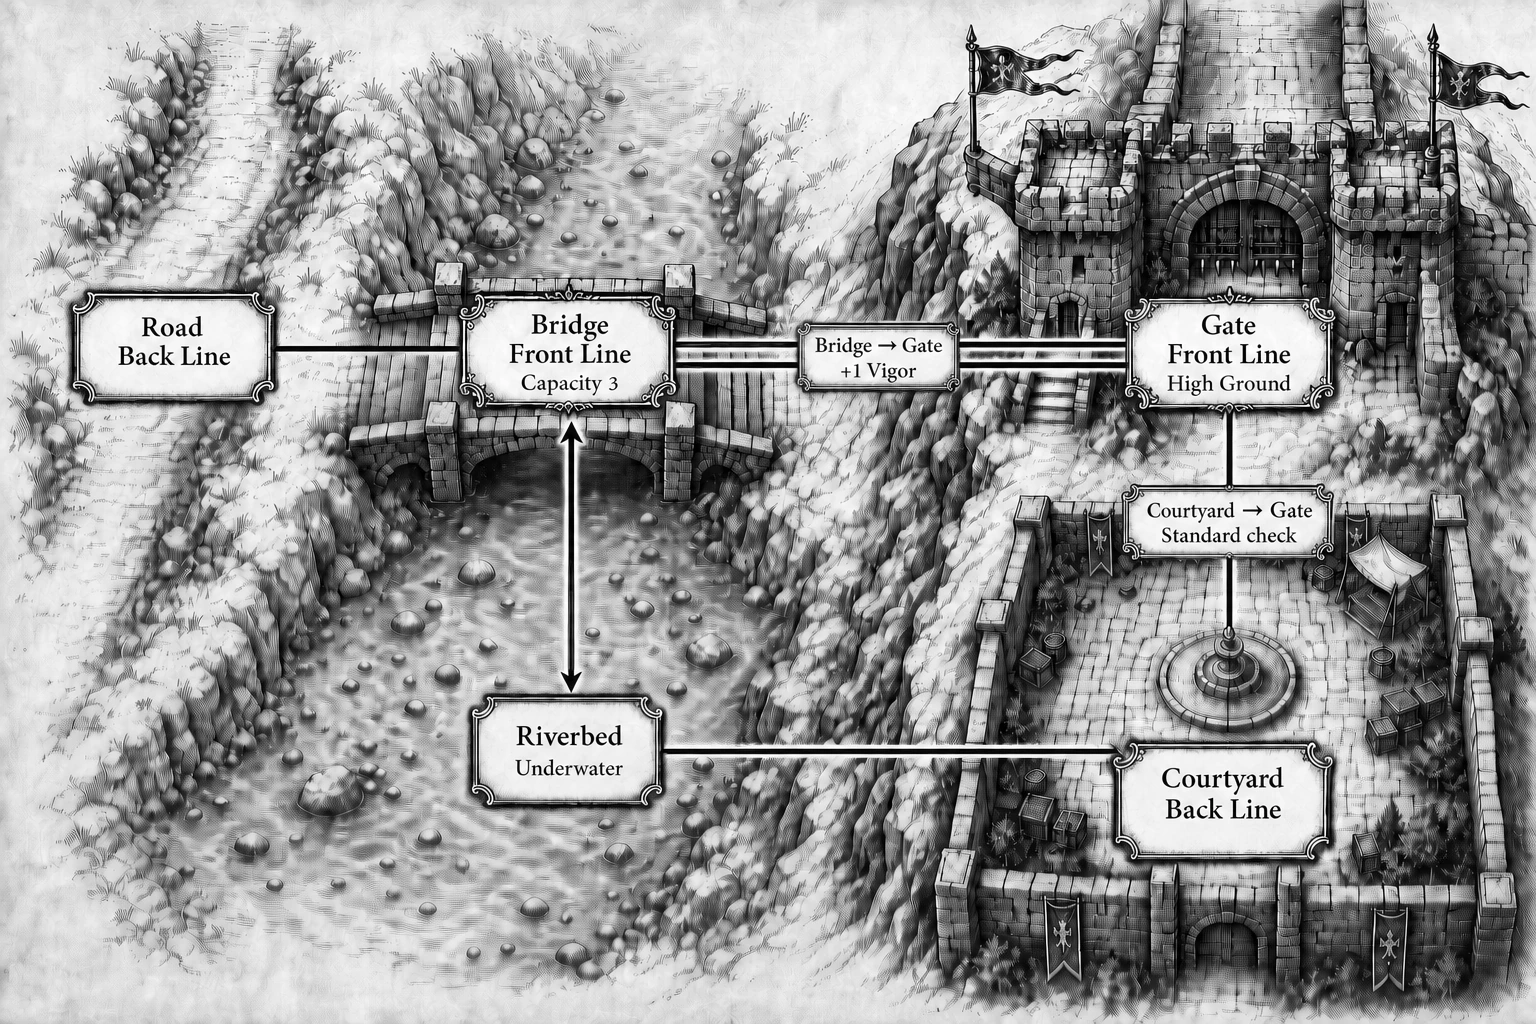
[Road Back Line]──[Bridge Front Line | Capacity 3]⇌[Gate Front Line | High Ground]
                              ↕                               │
                    [Riverbed | Underwater]──[Courtyard Back Line]
Entry gates for the Gate Front Line:
- Bridge → Gate: +1 Vigor.
- Courtyard → Gate: Standard check; failure spends the Move and prevents entry.
The bridge and gate put Capacity, Interdict, and Breakthrough at the center of play. The riverbed offers a second way across, at a price. The attacker wins by entering the Courtyard; the defender wins by holding the bridge for an agreed number of Lulls.
B. The Night Market — Vertical Flank
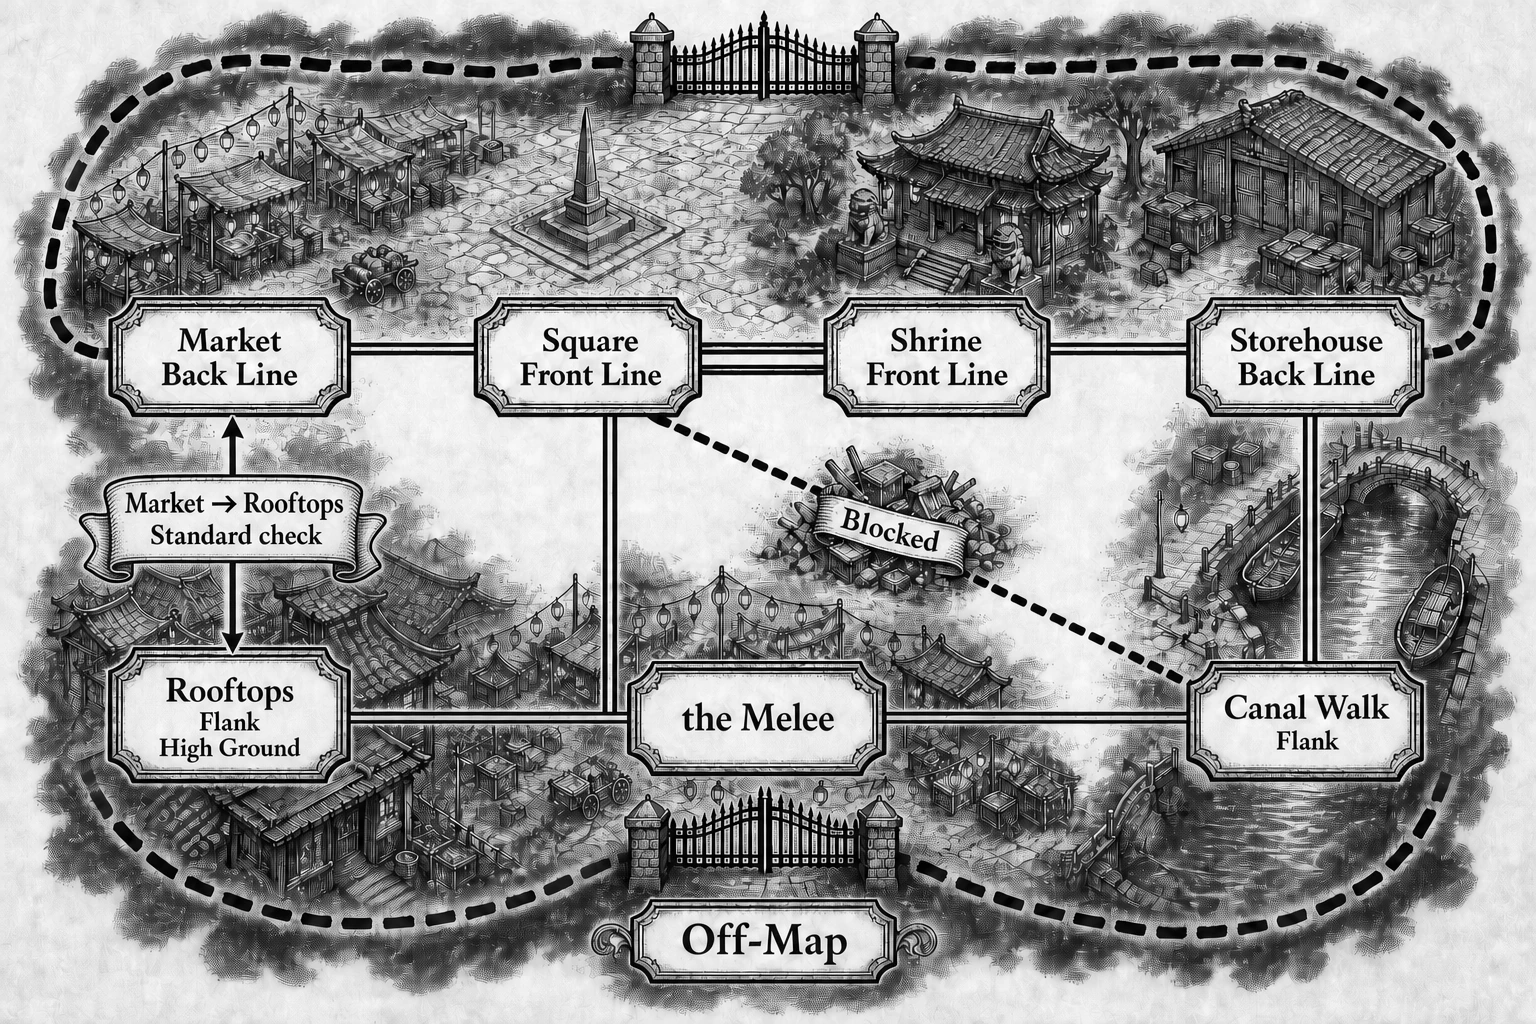
[Market Back Line]──[Square Front Line]⇌[Shrine Front Line]──[Storehouse Back Line]
[Rooftops | Flank, High Ground]──[the Melee]──[Canal Walk | Flank]

[Off-Map] = gated access from stealth, flight, invisibility, or [Off-Map Access]
[Market Back Line] ↕ [Rooftops] = Standard-check entry into High Ground
[Square Front Line] ── [the Melee] = ordinary edge
[Storehouse Back Line] ── [Canal Walk] = ordinary edge
[Square Front Line] x [Canal Walk] = blocked edge
The Market Back Line → Rooftops connection requires a Standard check; failure spends the Move and prevents entry. The blocked Square-to-Canal edge stays closed until someone opens it as an objective. The Rooftops favor ranged fire and stealth. The central Melee offers a fast route at the price of entanglement and friendly-fire risk. Victory can mean opening the Storehouse, escorting someone across the Square, or escaping through either Flank.
C. Dragon as Battlefield — Giant Creature
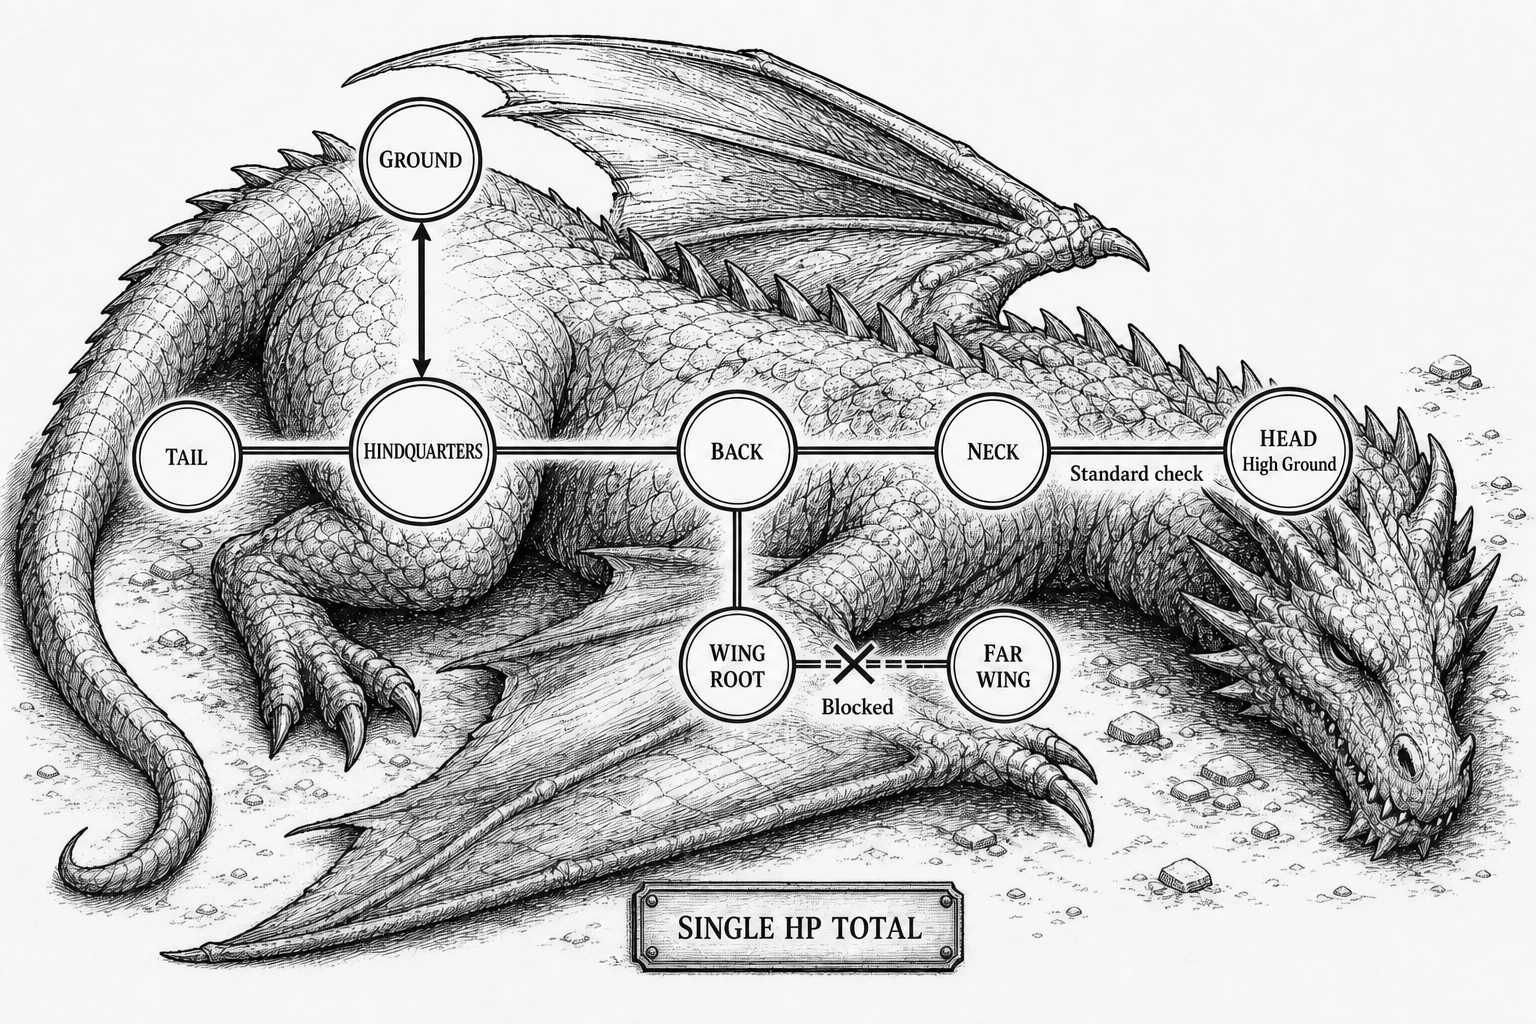
                         [Neck]──[Head | High Ground]
                           │
[Ground]↕[Hindquarters]──[Back]──[Wing Root]
             │                        x
          [Tail]                 [Far Wing]
Every node except Ground is a position on the same host creature. Entering Head from Neck requires a Standard check; failure spends the Move and leaves the climber in Neck. The blocked edge between Wing Root and Far Wing opens only if the fiction permits the wing to unfold or a restraint to be cut. Attacks still reduce the dragon's single host HP total; the map decides who can reach the rider, the chained relic, the vulnerable saddle, or the escape route. When the dragon changes position, remove or merge body Zones rather than writing a second damage engine.
One-Page Reference Card
Setup
| Participant | Maximum Vigor |
|---|---|
| PC | 10 + DEX modifier, 7–13 before armor; plate-grade armor −1 |
| Monster/NPC | 8 + ceil(HD / 2), maximum 13 |
Keep the host game's attacks or THAC0, AC, HP, damage, saves, spells, morale, and class features.
Checks
| Difficulty | Roll-under | d20 | No ability score |
|---|---|---|---|
| Standard | ability | DC 10 | save or d6 4+ |
| Hard | ability −4 | DC 14 | save or d6 5+ |
| Dire | ability −8 | DC 18 | save or d6 6 |
One step easier than Standard = automatic. No opposed checks.
The Count
- Round start: reset Vigor and apply carryover penalties.
- Highest remaining Vigor takes one Breath; total cost ≤5.
- Spend costs, resolve reaction windows, and compare again.
- Continue until all Vigor is 0; resolve the Lull.
When selected in the Count, a participant may forfeit all remaining Vigor and drop to 0 for the Round.
Ties: PC vs PC higher DEX → PC before monster → monster higher HD → GM.
Overload: Standard CON. Success = Breath resolves, next Breath Limit 3. Failure = Breath resolves, then remaining Vigor 0 and Exposed. A pending Limit 3 carries across the Lull to the creature's first Breath next Round.
Exposed: AC worsens by 4 (−4 ascending / +4 descending); no reactions or Stances. Ends at next own Count selection or Lull.
Action Costs
| Maneuver | Vigor | Maneuver | Vigor |
|---|---|---|---|
| Normal Attack routine | 2 | Heavy Attack routine | 3 |
| Move one Zone | 2 | Rush one Zone, next attack +1 | 3 |
| Focus | 4 | Release | 2 |
| Grapple or Shove | 3 | Improvised Action | 2 |
| Reload | 3 | Ready reaction | 1–2 |
| Declare Stance | 1–2 | End Stance | 0 |
Hold only one Focused spell at a time; a new Focus discards the held spell with no Vigor refund.
Two heavy Attacks cannot share a Breath. Flurry Fatigue is cumulative: first Attack ±0, second −2, third −4, then another −2 per Attack. Haste halves final costs, round up, minimum 1; Slow doubles them.
Reactions
| Reaction | Readied / Improvised | Effect |
|---|---|---|
| Guard | 1 / 2 | Before roll: AC improves by 4 for one attack. |
| Parry & Riposte | 2 / 3 | Melee only; AC improves by 2. On a miss, immediate basic Attack. |
| Interdict | 2 / 3 | Polearm/spear; when an enemy enters the Zone, immediate Attack. A hit deals damage and stops entry. |
A basic or opportunity Attack is one weapon attack roll and costs no Vigor. One defensive reaction per individual attack roll. Interdict uses a separate movement window. The target of a Perfect Ambush cannot use any reaction against it. A riposte counts toward Flurry Fatigue and optional per-Round Attack limits; an Interdict attack does not. Unused Readied reactions expire at next own Breath or Lull.
The Lull
End Exposed → discard unused Readied reactions → preserve Focus → reset per-Round counts → one maintenance choice per unit (Reload, first aid, Rally, change gear) → advance hazards → check combat end.
Zone Essentials
| Zone | Essential rule |
|---|---|
| Front Line | Polearm/spear attacks +1; dagger −1; cavalry charges allowed; engagement line is ordinary movement edge plus melee reach. |
| Back Line | Ranged attacks +1; Reload −1 Vigor; safe from melee until entered. |
| Flank | Better stealth; hidden Move + Attack = Ambush +2; Squad command +1 Vigor. |
| the Melee | Dagger/unarmed cost −1; polearm/two-handed +1; Grapple +2; formation and Stance benefits suppressed. |
| Off-Map | Gated entry; cannot target or affect the map while there; Move out + Attack = Perfect Ambush +2, with no reaction from its target. |
| High Ground | Ranged +2; melee attacks against an occupant −1; marked entry gate. |
| Underwater | No firearm/flame; Move +1 Vigor; Grapple +2. |
Control gates only the attack-roll bonuses and Vigor discounts from Front Line, Back Line, Flank, and High Ground. Protections, penalties, and every modifier of the Melee and Underwater apply regardless of Control.
A cavalry charge is Move or Rush plus one Attack maneuver in the same Breath, at listed costs; apply the host game's charge bonuses to that Attack.
Breakthrough, entering the Melee, and Forced Exit replace Move; entry surcharges add to that cost, and Rush may replace the Move component for +1 Vigor. All count as moving.
The Melee is never a Breakthrough target; always use its own entry and exit procedures.
Simple Control: PC or HD 4+ = 2 bodies; everyone else = 1. Higher total Controls; tie Contested. Recount only at Round start, entry/exit, defeat, or when a body-count or Control-contribution modifier begins or ends.
Breakthrough: 3 Vigor + Standard STR. Defenders counting at least twice the entering creature's bodies = Hard. Blocked narrow route = Dire. Failure: no entry, cost spent, Exposed. If a success into a full route is not stopped by an Interdict, the route goes over Capacity; no further entry until occupancy drops below Capacity.
Pincer: occupy two different Zones adjacent to the target; both groups attack it in the same Round; each completes an Attack. Then those two groups gain +2 on attacks into the target, the defenders take −1 on morale checks, and leaving the target Zone requires a Hard check (one step harder if that movement already required one).
the Melee: enter 2 Vigor, usually Standard unless light/skirmishing; leave 2 + Standard or Forced Exit 4 without a check.
Ranged fire is outside→inside only. On a miss, d6 1–2 automatically hits one random ally in the Melee for normal damage.
Credits, Production, and License
Creator and Contact
| Item | Details |
|---|---|
| Creator | Shellman |
| Contact and feedback | X (formerly Twitter) @ds62hg, @trpg_ds62 |
Design Lineage and Source Language
WarZone Count is an independent OSR combat module based on combat concepts from Konsei Reiyotan (混世霊妖譚), reworked and recalibrated for OSR play.
The core action-economy inspiration traces back to Nechronica - The Long Long Sequel - (original title: 永い後日談のネクロニカ), created by Ryou Kamiya.
Distribution and web edition: https://warzone-count.ds62.workers.dev/
Conceptual source: https://konsei-reyotan-rpg.pages.dev/
The English edition is the source/canon text for this work. Any Korean edition will be translated from this English source.
Generative AI Notice
A substantial portion of this material was created with the assistance of generative AI (LLMs) during planning, system design, drafting, prose refinement, and proofreading. Claude Code was used during system design, and Codex was used for the English draft and the Korean translation. The image generation process for this material used the GPT Image 2 model. Final editorial control and responsibility for publication remain with the creator.
If domestic or international laws concerning AI-assisted works change, this material will comply with the applicable laws.
Copyright and License
© 2026 Shellman.
Unless otherwise noted, the text, tables, and rules explanations in this work are licensed under the Creative Commons Attribution-NonCommercial-ShareAlike 4.0 International License (CC BY-NC-SA 4.0).
License deed and legal code: https://creativecommons.org/licenses/by-nc-sa/4.0/
Users must provide reasonable attribution, including the creator name, the title of the material, the original source or distribution location, and an indication of whether changes were made. If users adapt, translate, rearrange, or create non-commercial derivative material based on this work, the resulting material must be distributed under the same license or a compatible license.
Commercial use, paid publication, distribution through paid platforms, inclusion as paid supporter rewards, mass print distribution, and separate merchandising are not permitted without prior permission from the creator.
Cover images, interior illustrations and diagrams, logos, third-party quotations or references marked separately, third-party rights material, platform trademarks, and service names are not covered by this license unless separately marked.
Attribution Example
WarZone Count — An Action-Point Combat Engine for OSR Games,
© 2026 Shellman, CC BY-NC-SA 4.0.
Original source: https://warzone-count.ds62.workers.dev/
Changes: [none / modified / translated / rearranged]